
3D printed shaving stuff
- Thread starter sɐǝɹpu∀
- Start date
SlimGem
Forum GOD!
SOTD 8.25.23
Soap: Fine Santal Absolut
Brush: 3D Printed Simpson Alexander Trafalgar with a synthetic knot
Razor: 3D Printed SE
Blade: Personna GEM PTFE SS
Post-shave: Fine Santal Absolut
Another one of my favorite soaps with a great scent. Too bad it's discontinued.

Soap: Fine Santal Absolut
Brush: 3D Printed Simpson Alexander Trafalgar with a synthetic knot
Razor: 3D Printed SE
Blade: Personna GEM PTFE SS
Post-shave: Fine Santal Absolut
Another one of my favorite soaps with a great scent. Too bad it's discontinued.
Last edited:
ischiapp
Doctor Strange of Wetshaving
I love The Taipan.
SlimGem
Forum GOD!
At some point, they will. The DE version was added a week ago.
ischiapp
Doctor Strange of Wetshaving
MARS aka Modulat Adjustable Razor System.
https://www.atgshaving.com/threads/mars-razor.21561/
https://www.atgshaving.com/threads/mars-razor.21561/
SlimGem
Forum GOD!
Just thought I share my method for making straight razor scales. While this isn't necessarily 3d printing, it is 3d carving (the total opposite of 3d printing).
The scales in this post are for a Dubl Duck Special N0.1 blade that I restored some time ago.
First I trace the scales from pictures and scale to size by referencing the blade dimensions. The idea is to keep the geometry as close to the original as possible, but since I'll be using birds eye maple, I will add just a bit more thickness. After tracing, I'll create a 3d model that will be used for programming the 3d tooling paths on a CNC router.
Once the tooling paths are generated, the CNC router takes over and does the dirty work. For this project, two 3d passes are generated. The first pass is the roughing pass which removes the bulk of the material and prepares the surface for the finishing pass.

This is after the finishing pass. They are now ready for sanding.

The Dubl Duck trademark is added with a laser before sealing and coating.

The next step creates extra work, but it's well worth it. I dip the scales in CA glue for about five minutes, and then they air dry for about an hour. At this point, the CA has penetrated the wood enough to almost turn it into plastic. After some more sanding, natural tung oil is used for surface coating. The tung oil cannot penetrate the CA coating, it only creates a working surface for polishing.
After some alternating passes of sanding with 5000 grit pads and polishing with Mother's Plastic Polish, this is the end result.

The scales in this post are for a Dubl Duck Special N0.1 blade that I restored some time ago.
First I trace the scales from pictures and scale to size by referencing the blade dimensions. The idea is to keep the geometry as close to the original as possible, but since I'll be using birds eye maple, I will add just a bit more thickness. After tracing, I'll create a 3d model that will be used for programming the 3d tooling paths on a CNC router.
Once the tooling paths are generated, the CNC router takes over and does the dirty work. For this project, two 3d passes are generated. The first pass is the roughing pass which removes the bulk of the material and prepares the surface for the finishing pass.
This is after the finishing pass. They are now ready for sanding.
The Dubl Duck trademark is added with a laser before sealing and coating.
The next step creates extra work, but it's well worth it. I dip the scales in CA glue for about five minutes, and then they air dry for about an hour. At this point, the CA has penetrated the wood enough to almost turn it into plastic. After some more sanding, natural tung oil is used for surface coating. The tung oil cannot penetrate the CA coating, it only creates a working surface for polishing.
After some alternating passes of sanding with 5000 grit pads and polishing with Mother's Plastic Polish, this is the end result.
sɐǝɹpu∀
riverrun
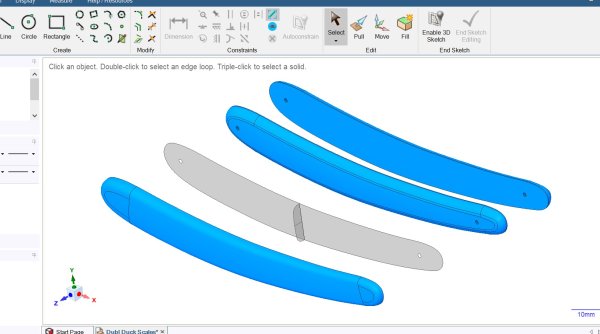
Tempting. I have access to both a CNC router and a laser cutter/engraver, but I haven't caught the straight razor bug yet. Phew.Just thought I share my method for making straight razor scales. While this isn't necessarily 3d printing, it is 3d carving (the total opposite of 3d printing).
The scales in this post are for a Dubl Duck Special N0.1 blade that I restored some time ago.
First I trace the scales from pictures and scale to size by referencing the blade dimensions. The idea is to keep the geometry as close to the original as possible, but since I'll be using birds eye maple, I will add just a bit more thickness. After tracing, I'll create a 3d model that will be used for programming the 3d tooling paths on a CNC router.
View attachment 139532
Once the tooling paths are generated, the CNC router takes over and does the dirty work. For this project, two 3d passes are generated. The first pass is the roughing pass which removes the bulk of the material and prepares the surface for the finishing pass.
View attachment 139533
This is after the finishing pass. They are now ready for sanding.
View attachment 139534
The Dubl Duck trademark is added with a laser before sealing and coating.
View attachment 139535
The next step creates extra work, but it's well worth it. I dip the scales in CA glue for about five minutes, and then they air dry for about an hour. At this point, the CA has penetrated the wood enough to almost turn it into plastic. After some more sanding, natural tung oil is used for surface coating. The tung oil cannot penetrate the CA coating, it only creates a working surface for polishing.
After some alternating passes of sanding with 5000 grit pads and polishing with Mother's Plastic Polish, this is the end result.
View attachment 139537
Are there any CNC safety razor designs in the pipeline, Roger?
SlimGem
Forum GOD!
Not at the moment. I might give that a try when I convert the CNC to a 4-axis. I think the TNNSER would be a good candidate for the CNC.Tempting. I have access to both a CNC router and a laser cutter/engraver, but I haven't caught the straight razor bug yet. Phew.
Are there any CNC safety razor designs in the pipeline, Roger?
sɐǝɹpu∀
riverrun
Not at the moment. I might give that a try when I convert the CNC to a 4-axis. I think the TNNSER would be a good candidate for the CNC.
It would, but I don't have a 4-axis CNC machine availableNot at the moment. I might give that a try when I convert the CNC to a 4-axis. I think the TNNSER would be a good candidate for the CNC.

SlimGem
Forum GOD!
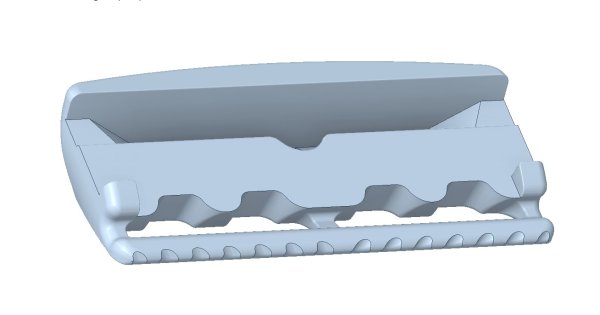
The TriDE Safety Razor is a simple, more traditional tried and true three-piece design. I designed it with ease of printing in mind by maintaining a 0.2mm layer height design increment and keeping the thread in line with the shaft layers for a stronger and cleaner print. The only post-processing required is breaking away the included supports on the cap.

View: https://youtu.be/Eg90n6loe8w?si=Uxw2EQ3gI7k_fMjC
The STLs for the TriDE safety razor are available for download here:

 www.thingiverse.com
or here:
The STLs for the TriDE safety razor are available for download here:
TriDE Safety Razor by rogerquin
The TriDE Safety Razor seamlessly combines the ease of 3D printing with the time-tested, tried, and true principles of a traditional safety razor design. Designed for simplicity, it exemplifies the following key points:Effortless 3D Printing:Engineered with precision for 3D printing, the TriDE...
or here:
SlimGem
Forum GOD!
I had a great shave this evening with PRE de PROVENCE No. 63 and my Gold Tone Fat Handle G Tech with a combination OC SB 3D printed base plate. The plates are closer to medium aggression, so, I'll keep tweaking them for a slightly more aggressive feel. It was a fun shave. The 1st pass was with the OC and 2nd pass was with the SB.


SlimGem
Forum GOD!
3D PRINTED BASE PLATES
I finally got around to finalizing this small upgrade for the Fat Handle Gillette Tech. There are quite a few variations of GTs and I only have a few to test, so, I hope they fit every GT out there.
These 3 sets of 3D-printed base plates will convert your vintage Fat Handle Gillette Tech safety razor into a Semi-Adjustable razor. The plate sets come in either an open comb, safety bar, or a combination of the two. Each set includes 3 base plates and has 3 levels of efficiency. The base plates are marked with notches on the side which indicate the level of efficiency ( 1 notch = mild, 2 notches = medium, and 3 notches = aggressive ).


The files are available for download here:
I finally got around to finalizing this small upgrade for the Fat Handle Gillette Tech. There are quite a few variations of GTs and I only have a few to test, so, I hope they fit every GT out there.
These 3 sets of 3D-printed base plates will convert your vintage Fat Handle Gillette Tech safety razor into a Semi-Adjustable razor. The plate sets come in either an open comb, safety bar, or a combination of the two. Each set includes 3 base plates and has 3 levels of efficiency. The base plates are marked with notches on the side which indicate the level of efficiency ( 1 notch = mild, 2 notches = medium, and 3 notches = aggressive ).
The files are available for download here:
SlimGem
Forum GOD!
After some minor tweaks of the blade gap and safety bar offset, I'm calling this fully 3D-printed safety razor design complete. I wanted to design a razor that is easy to maneuver, provides good audible feedback, and would use readily available blades. The gap between the safety bar and the anvil is fairly large but doesn't compromise the blade support. This makes it easier for the lather to flow through and it is also easier to rinse. The efficiency is just below medium according to my preference and there is plenty of blade feel, but it's all non-threatening. A very smooth shaver for sure. I'm quite happy with the results, but I'll admit, it's not an easy print on FDM printers.


The files are available as free downloads here:
 www.thingiverse.com
or here:
The files are available as free downloads here:
Half DE Safety Razor "H-DE" by rogerquin
This fully 3D-printed safety razor uses a halved DE blade and has a smaller head profile making it easier to maneuver. The oversized gap between the safety bar and blade support makes it easy to rinse and provides better audible feedback. Please post your makes. EnjoyPlease note:This razor...
or here: